
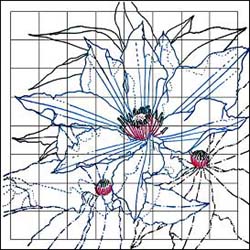
4. A colour photograph of clematis covered with a square grid. To produce the working drawing details of the flowers were transferred a square at a time to an enlarged grid the size of the silk.
Page 2
Silk Painting using "Hidden" Gutta Lines
Planning Your Design
It is possible to paint freehand using the “hidden” gutta line technique if the design is very simple but the secret of a successful silk painting using the “hidden” gutta technique is to plan the sequence of gutta lines and colours before you start to paint. Choose the subject and work out your design. It is helpful either to produce a full colour sketch or to have a colour photograph or computer printout.
Make an enlarged working pencil drawing on cartridge paper the same size as your silk painting frame. Draw a square grid on your design. If you are using a photograph you can trace the image and draw the grid on the tracing paper or overlay the photograph with a grid drawn on clear film. Draw an enlarged grid with the same number of squares on the sheet of cartridge paper and copy the design using the squares as a guide.
Look at your design and plan the order in which you will paint the colours. Remember that within an area the light colours must be painted before the dark colours and that because silk paints are transparent the effect of layering colours will be the same as mixing them. For example yellow over-painted with blue will become green. This can be a problem if you want yellow next to blue. I explain how to deal with difficult colour combinations later.
Select the lines on the drawing that will become the gutta lines on your silk painting. Plan the sequence of gutta lines so that as far as possible you will only paint to one side of each gutta line unless you want the line to be seen as part of the design.
A simple colour coding of the lines on the working drawing will remind you of the sequence that you have worked out. If you use a red marker pen to colour the first lines to be drawn with gutta and a blue marker pen for the rest you will be able to distinguish them from each other when the drawing is placed behind the silk.
Broken lines can be used to indicate areas of shading and to differentiate elements of a complicated design. For example solid lines may be used to indicate a petal’s outline with broken lines indicating it’s veining.
|
|
|
|
4. A colour photograph of clematis covered with a square grid. To produce the working drawing details of the flowers were transferred a square at a time to an enlarged grid the size of the silk. |
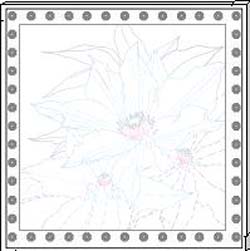
5. The working drawing coded using coloured lines, solid lines and broken lines. |
A USEFUL TIP
When planning a silk painting remember that you
will be working from light areas to dark areas and that before you start
painting you must first decide whether the background will be lighter or darker
than the main subject. A light background must be painted first but a dark
background will be the last part of the picture to be painted.
Preparing
The SilkUse short strips of masking tape or silk pins to fasten the finished working drawing in position on the back of your painting frame. The frame should be at least 1.5cm deep so that there will be a gap between the paper and the silk when it is stretched and pinned to the front of the frame.
The drawing will not touch the silk and can be left attached to the frame throughout the painting process.
Hold a length of silk along one edge of your frame and make a snip with a pair of scissors in the selvedge to mark where the silk is to be cut. Grasp the silk firmly with each hand either side of the snip. Pull your hands apart and tear the silk at one go across its width. Snip the selvedge at the other side.
Tearing the silk will produce a straighter edge than could be achieved with scissors and it will be aligned with the weave of the silk. Once again measure, snip and tear this piece of silk to produce a smaller piece the size of your frame.
You may find that it is necessary to wash and dry the silk before it is used to remove the manufacturer’s finish. Most of the small creases will disappear once the silk is stretched and pinned onto the frame but any heavy creases should be ironed out before the silk is pinned onto the frame.
Stretch and pin the piece of silk onto the front of your frame. When attaching the silk, the tighter you can stretch it, the easier it will be to draw accurate gutta lines.
Space the silk pins evenly along each side of the frame and opposite each other to ensure an even tension in the silk. This is very important if the design is geometrical or has straight lines.
Start by stretching and pinning the silk to the two corners of the frame furthest from you. Insert another pin mid-way between the first two and continue inserting pins along this the far edge, mid-way between pairs of pins, until the whole edge is pinned. Use at least one pin every 5cm.
Stretch and pin the silk to the other two corners. Insert pins in the near edge repeating the same sequence
of pinning. However this time make sure the silk is also stretched tightly and evenly
across the frame. You can adjust the tension of the silk if it is necessary by re-pinning.
Pin the remaining two edges to the frame in the same way.
Draw a margin of clear gutta on the silk around the inner edge of the frame. Use a straight edge to keep the lines straight. The lines of gutta will stop the silk paint from spreading onto the frame and keep it clean. Dry the gutta lines with a hairdryer.
You should be able to see the working drawing through the silk, if not use a light box to help you trace the lines onto the silk with a gutta pen, as and when they are needed.
A USEFUL TIP
Use extra pins at each corner where they tend to pop out of the frame because the
tension there pulls in two directions.
6. The frame with the working drawing attached to the back,
the silk pinned on the front and the margin line drawn in with clear gutta. The
working drawing can just be seen through the silk.
The Painting Sequence
The process of sequential gutta work and layered silk painting starts with the lightest
tones and gradually proceeds to the darker tones. The two paintings of
"Autumn Leaves" show how different effects can be achieved from the
same design by reversing the sequence and by choosing a different range of
colours.
In the second version the light veins of the main leaves were painted
first and the dark blue background was painted last. In the centre the dark
blue covers brown under-painting and appears almost black whereas at the edges
the silk had not previously been painted and the dark blue appears its
true colour. If an even background colour is required the brown under-painting
should be extended to the edges before the blue is applied. In this version the
salt effect gives a frosted look to the upper leaves.
7. The working drawing for “Autumn Leaves” using different colours to identify
the sequence of gutta lines.
8. "Autumn leaves One"
9. "Autumn Leaves Two"
 In the first version of “Autumn Leaves” the light cream
background was painted first and the dark shading on the main leaves was the
last paint to be applied. Salt was sprinkled on the painted leaves while they
were still wet and the paint was left to dry naturally. This gives texture to
the fallen leaves.
In the first version of “Autumn Leaves” the light cream
background was painted first and the dark shading on the main leaves was the
last paint to be applied. Salt was sprinkled on the painted leaves while they
were still wet and the paint was left to dry naturally. This gives texture to
the fallen leaves.


A USEFUL TIP
If you use salt on wet paint obviously you cannot dry the silk with a hairdryer. Before you apply the paint, wet all of the silk up to any gutta lines. Then as the paint spreads, during the slower drying process, it will not reach the edge of a dampened area and form an ugly hard outline.