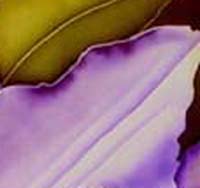
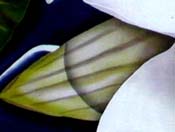
 This detail of arum lilies shows the subtle shading that can be
achieved with silk paints. The sequence of applying clear gutta lines and paint
is worked out so that lighter areas are isolated one after another from ever-darker shaded areas.
This detail of arum lilies shows the subtle shading that can be
achieved with silk paints. The sequence of applying clear gutta lines and paint
is worked out so that lighter areas are isolated one after another from ever-darker shaded areas.Page 5
Special Effects using "Hidden" Gutta Lines
Shading
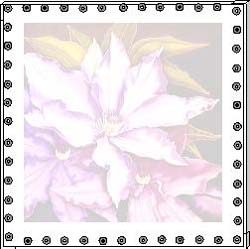
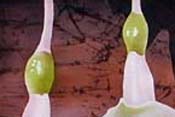
This detail of arum lilies shows the subtle shading that can be
achieved with silk paints. The sequence of applying clear gutta lines and paint
is worked out so that lighter areas are isolated one after another from ever-darker shaded areas.
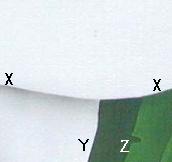
Draw a line of gutta (X-X) across the white silk and dry with a hairdryer. Dampen the silk below the gutta line. Paint a narrow stripe of grey across the silk against the lower edge of the gutta line. Push the grey paint up to the gutta line using a brush loaded with clean water. This will also soften the lower edge of the grey stripe. Dry the silk quickly to capture the shadow effect.
Draw the short sloping line of gutta down to (Y) and dry the gutta. Dampen the bottom right-hand corner, paint the area light green and dry the silk.
Draw the short sloping line of gutta down to (Z) and dry the gutta. Dampen the area between the lines, paint the area dark green and dry the silk.
This method of silk painting “hides” all the gutta lines and is at the heart of the “hidden” gutta line technique.
A USEFUL TIP
Always paint onto damp silk and dampen a much larger area of silk than the area to be
painted. As the paint spreads, the damp silk will soften its outline but if the
paint reaches the edge of the dampened area, a hard outline will appear.
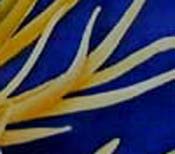
Detail Lines
 The veins of leaves and petals are easy to achieve with clear gutta and silk paints if they are a lighter
shade of the leaf or petal colour.
The veins of leaves and petals are easy to achieve with clear gutta and silk paints if they are a lighter
shade of the leaf or petal colour.
Wet the silk, paint the leaf or petal a pale shade of colour, and then dry the silk with a hairdryer. Draw gutta lines over the painted area for each of the veins and use the hairdryer to speed up drying the gutta. Draw and dry the gutta lines one at a time.
Dampen the silk being careful not to cover the gutta lines with water because the gutta is water-soluble and dissolves if it gets too wet. Apply a darker shade of paint each side of the gutta lines and dry the silk.
If the veins are darker then the effect is more difficult to achieve. Wet the silk, paint the leaf or petal its finished shade, and then dry the silk with a hairdryer. Draw the gutta line for the lowest vein over the painted area and use the hairdryer to speed up drying the gutta.
Dampen the silk above and to the left of the gutta line. With a darker shade of colour paint a thin line along the upper side of the gutta line. Push the paint against the gutta line with a brush loaded with clean water. Once the effect has been achieved dry the silk quickly. Repeat the process for the other lines.
A USEFUL TIP
Try not to wet the dried gutta because it will
dissolve and wet paint will seep through the gaps.
Highlights
Difficult Colour Combinations
To overcome this problem control the spread of yellow paint with clear water and restrict it as near as
possible to the area you want to be yellow in the finished painting. This will mean
painting and drying each yellow section until the design is built up rather
than painting the yellow area in one application.
After the gutta outline is applied and the surrounding area painted blue there will be some overlap of
colour. In the example the overlap of colours produced a dark blue halo around
the petals. If a lighter blue had been used for the background a green halo
effect would have resulted from the slight overlap with the yellow under-painting.
The colours produced when different colour combinations are placed next to each
other should be taken into account when planning a silk painting. If the rules
of colour mixing can be used as part of the design it makes painting much easier.
Another way of solving this problem is to use temporary gutta lines.
Permanent Gutta
The permanent details can be added at any time during the painting process but it may be easier to leave them
until last.
When painting a series of lines that are close to each other or join, paint and dry a few
at a time otherwise they will join together whilst wet and produce a single blob of paint and spoil the
painting.
USEFUL TIPS
Only paint to one side of a gutta line unless you want to make a feature of the line.
Dry with a hairdryer after every application of gutta and silk paint.
Batik Wax Crackle
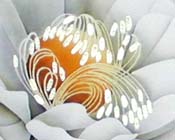
 Highlights are easy to produce in silk painting using clear gutta. On shiny surfaces the light source is
reflected and appears as a white mark. Look carefully at your resource material
or image and decide where these white marks should be placed. Colour code them
red on your working drawing as they will be the gutta marks you apply first
before you start to paint. Highlights are often associated with curved surfaces
therefore shading and shadows will add to the impression of depth and form. Remember to keep the position of
the light source the same when painting highlights, shading and shadows.
Highlights are easy to produce in silk painting using clear gutta. On shiny surfaces the light source is
reflected and appears as a white mark. Look carefully at your resource material
or image and decide where these white marks should be placed. Colour code them
red on your working drawing as they will be the gutta marks you apply first
before you start to paint. Highlights are often associated with curved surfaces
therefore shading and shadows will add to the impression of depth and form. Remember to keep the position of
the light source the same when painting highlights, shading and shadows.
 It is difficult to layer some colours over others and accurately produce the second colour. For example if
you paint blue over yellow it will appear green rather than blue.
It is difficult to layer some colours over others and accurately produce the second colour. For example if
you paint blue over yellow it will appear green rather than blue.
 Intricate details that are difficult to outline with clear gutta can be painted with a
fine brush using black, coloured or white permanent gutta or acrylic paint thinned with a little water or silk
paint. By diluting using silk paint you can make the permanent gutta the colour of your choice.
Several layers can be applied to create solid blocks or lines that act as a resist.
Intricate details that are difficult to outline with clear gutta can be painted with a
fine brush using black, coloured or white permanent gutta or acrylic paint thinned with a little water or silk
paint. By diluting using silk paint you can make the permanent gutta the colour of your choice.
Several layers can be applied to create solid blocks or lines that act as a resist.
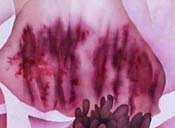
 The wax crackle effect is a batik technique that gives
a unique textured effect. At the end of the painting process cover the whole of
the silk with hot liquid batik wax using a wide brush. Take the silk off the frame and place it in
your freezer for a few minutes to harden the wax. Crumple the silk to produce
random cracks in the wax. Straighten out the silk and pin it back onto your
painting frame.
The wax crackle effect is a batik technique that gives
a unique textured effect. At the end of the painting process cover the whole of
the silk with hot liquid batik wax using a wide brush. Take the silk off the frame and place it in
your freezer for a few minutes to harden the wax. Crumple the silk to produce
random cracks in the wax. Straighten out the silk and pin it back onto your
painting frame.
Paint into the cracks using a brush. Apply the paint sparingly because it will seep quickly through to the silk. Only paint the areas where you want the crackled texture to appear. Be careful near gutta lines, as the crackled wax will allow the paint to cross them. You can apply different colours and different dilutions of paint to get various shading effects into the crackle.
Dry the silk and wipe off any surplus paint from the wax with a piece of damp paper towel because any dried paint left on the surface will mark the silk when you remove the wax.
Remove the wax by ironing the silk between sheets of lining paper. You can also use old newspapers but not in direct contact with the silk because the ink will mark the silk.
To some extent you can pre-determine the style of the crackle by the way you crumple and fold the waxed silk. Rolling and folding the silk will produce a parallel pattern of cracks.
Torn Paper
 By using torn paper as a resist a soft textured outline can be achieved.
Dampen the silk where the effect is to be painted and well beyond to create a holding area. Tear strips of paper at least 1cm wide with edges the shape of the required effect. Dampen the paper and lay it on the damp silk adding extra water with a brush to make sure there are no air pockets between the paper and silk. Arrange the strips of wet paper so that they form the required shape and dab off any excess water with a paper tissue.
Apply silk paint to the area between the strips of paper and dry the silk quickly with a hairdryer. The paper can be removed once it is dry but continue drying the silk until it is completely dry. Do not use too much paint because the excess may seep under the paper and mark the silk where you do not want it.
Acetate Stencils
 It is not possible to paint a series of dark lines crossed by other dark lines
just using gutta resist lines. To solve this problem cut a stencil with a
series of lines from acetate film. Place the stencil on the damp silk and
follow the painting and drying instructions for torn paper.
It is not possible to paint a series of dark lines crossed by other dark lines
just using gutta resist lines. To solve this problem cut a stencil with a
series of lines from acetate film. Place the stencil on the damp silk and
follow the painting and drying instructions for torn paper.
When the stencil has been removed there will be no resist lines on the silk. Now draw a gutta line across the series of parallel lines and paint the curving vertical line.
There are further uses of stencils in the "designs" section.
Mounting a Silk Painting
When a silk painting has been fixed, washed and the creases ironed out, it is ready to be attached to a piece of white acid free mountboard.
|
|
|
|
|
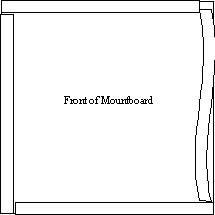
The Painting pinned to the frame in reverse. |
The mountboard with double-sided tape attached. |
The mountboard attached to the silk painting. |
1. Pin the silk back onto the painting frame but this time with its reverse side uppermost. Use extra pins to get an even tension across the whole painting making especially sure that any straight lines in the design are not distorted. Place the pins along the outer edge of the silk leaving as wide a border as possible to attach the mountboard.
(Alternatively the painting can be pinned or taped with short strips of masking tape to a large wooden board or work surface.)
2. Measure the width and height of the silk inside the lines of pins and cut the board to these measurements so that it will not cover the pins.
3. On the front of the board stick a length of 25mm wide double-sided acid free tape along each side. Peel off the backing strips.
4. Carefully line up the board so that it does not cover any pins and press it down onto the silk.
5. Turn the frame over and gently run your finger along the edges of the painting to secure the silk to the board. Turn the frame over again and unpin the silk.
6. Fold the excess silk behind the board and stick it down with gummed tape. The excess silk will be useful should you need to re-stretch the silk painting at any time in the future.
The painting is now ready to be fitted behind a decorative mount. This should be cut to mask the edges of the painting where it is fixed to the tape.
If a silk painting is framed behind glass the decorative mount will prevent the silk from coming into contact with the glass. The gap between the glass and the painting will protect the silk from any condensation that forms on the underside of the glass. Display framed silk paintings in a dry place out of direct sunlight.
A USEFUL TIP
Include a border around your initial design to allow for the width of the double-sided fixing tape.
Copyright ©2010 Leonard Thompson Paintings on Silk
Last revised: May 03, 2010