 |
1. Prepare a silk covered frame as explained on page 2. Attach your working drawing to the back of the frame.
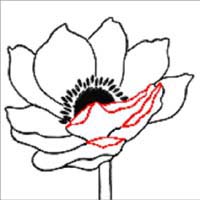
Using clear gutta draw on the silk the outlines shown in red on the working design. Dry the gutta with a hairdryer. These areas of the design are white and will remain unpainted.
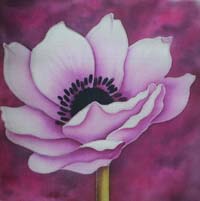
Mix a range of colour tones for the petals. Test the colours on a scrap of cartridge paper. If a note is made of the number of drops of each colour of silk paint used for each tone and the amount of water you can re-mix the exact colour if you run out of paint. I used a mixture of magenta, plum and violet but you can choose your own colour scheme.
|
|
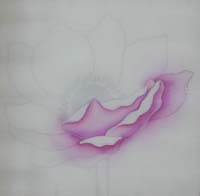
2. Dampen a large area of silk around the gutta outlines and remove any surplus water with a folded paper tissue so that the silk is damp rather than wet. By painting onto damp silk the edges of the painted areas will be softened. Paint the lower petals but most importantly allow the colour to flow beyond the petal shapes.
Use a hairdryer to halt the flow of paint and speed drying. Dampen the area of silk a second time and paint a narrow stripe of darker paint against the lower edge of one area of gutta. Push the paint up towards the gutta using a brush loaded with clean water. This will also soften the lower edge of the stripe. Dry the silk quickly with a hairdryer to capture this shading effect.
Repeat the process of adding shading to the undersides of the remaining areas of gutta. Next draw the outlines of the painted petals in clear gutta on top of the pale tint and dry with a hairdryer. Against one side only of these new gutta lines paint further shading and each time dry with a hairdryer.
|
|
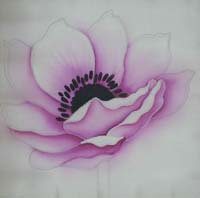
3. Mix a little black permanent gutta with a spot of water and paint on the dry silk the ball of carpels at the centre of the anemone. Dry the paint with a hairdryer. Do not paint the black stamens at this stage.
Dampen a large area of silk above the painted area and paint the upper petals the pale tint. Paint the centre of the flower first and allow the colour to flow outwards and blend with the water in the silk.
Dry with a hairdryer.
Repeat the painting process, this time with the darker paint in the centre of the flower. Also allow the darker colour to flow outwards but not as far out as the lighter under-painting flowed.
Dry with a hairdryer.
|
|
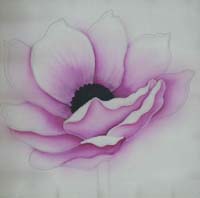
4. With clear gutta outline the central petal. This petal partly covers its two adjacent petals. Use the technique explained in (2) to indicate the overlap by shading these two adjacent petals. Outline these two petals with clear gutta and dry it with a hairdryer.
Continue to add shading and shadows to all the petals one at a time. Use a darker tone of paint when shading on the lower petals. Outline each petal with gutta after it is shaded until the whole flower is shaded and outlined.
Next using the black permanent gutta, paint in the black stamens with a fine brush on dry silk and dry with a hairdryer.
 |
5. Mix colours for the stem and its shading. Dampen the silk below the flower and paint a vertical stripe the width of the stem. Dry the silk before the paint spreads. Dampen the same area of silk and use the shading technique to paint shading on the stem immediately below the flower.
Dry with a hairdryer. Draw a gutta line down the right hand side of the stem and dry it with a hairdryer. Dampen the silk to the left of the gutta line and paint a vertical line of shading down the left hand side of the stem. Let the shading spread and blend but dry the silk before the shading reaches the vertical gutta line.
Choose colours for the background that will cover those you have used so far. I used the same colours undiluted that I had selected for the anemone. Dampen all of the background and as you paint let the colours flow and blend to create a mottled effect.
Intensify some of the petal shading at this point if you want to give more form to the flower. Fix the paints before washing out the gutta lines.
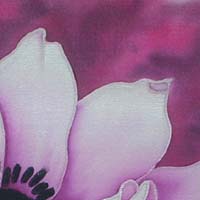 |
6. If you look closely you will see that while I was painting the background I accidentally painted the tip of a petal with darker paint. I was able to remove some of the paint with a wet cotton bud, but it was impossible to remove all the paint.
The best action in cases like this is to make the accident look like part of the design. I outlined the darker area with gutta and painted shading inside the area of gutta. Then I added gutta lines and painted shading on another two petal tips.
One shaded petal tip would look like a mistake but three shaded tips look like an intentional part of the design.
|
|
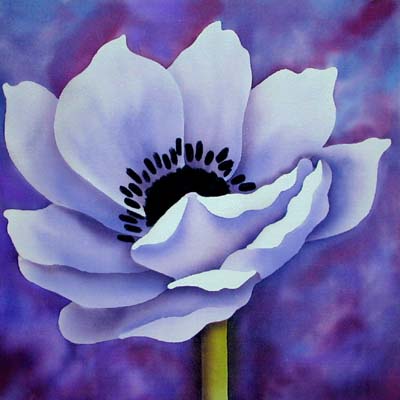
The choice of colours used in the designs can be varied and some unusual effects achieved. In this example a palette of blues was used. If complementary colours are used they will produce dark tones where they mix or overlap. To avoid this, paint and dry each area one at a time, apply each colour to its allotted area and restrict its spread using a brush loaded with clean water. Use a hairdryer to speed drying.