 By using a simple stencil or template you can easily create shaped paint marks on the silk.
The first example is the stencil for the petal markings on the "Rhododendron" design and the second example
is the template for the "Tulip" design.
By using a simple stencil or template you can easily create shaped paint marks on the silk.
The first example is the stencil for the petal markings on the "Rhododendron" design and the second example
is the template for the "Tulip" design.Page 6
Using the Silk Painting Designs
Studying the Design
Spend some time studying the design alongside the image and the notes. Decide on the detailed sequence of gutta lines and colours that you are going to follow. You may find it useful to make a written note of your decisions and to number the working drawing with your chosen sequence.
Always work from light areas to dark areas and decide whether the background will be lighter or darker than the main subject. This is important because the lightest areas must be painted first.
The designs show all the lines that will be the gutta outlines on the silk painting. Most of the gutta lines produce edges and once the gutta has been applied, only the silk to one side of the line is painted with further layers of paint. If a solid line is part of the design then both sides can be painted.
It is possible to paint freehand using the ‘hidden’ gutta line technique if the design is kept very simple but the secret of the designs in this handbook is that the sequence of gutta lines and layers of colour are planned before painting starts.
Enlarging the Design
Print copies of the designs in this ebook to make enlarged working drawings in pencil on cartridge paper the same size as the silk painting frame you wish to use. Do this by “squaring up”. Draw an enlarged 4x4 grid on the sheet of cartridge paper and copy the design using the squares as a guide.
Once the working drawing is completed go over the pencil lines with waterproof felt tip marker pens so that the design can be seen when the drawing is placed behind the silk. Use a waterproof marker so that if wet silk touches the working drawing it will not pick up ink from the paper.
Some of the designs have a simple colour coding or broken and dotted lines to help differentiate different elements of the design when it is viewed through the silk on your painting frame. You can add to this colour coding by blocking in certain areas with solid colour. This may further help you to identify various parts of the design.
Transferring the Design to Silk
Fix the working drawing with masking tape or pin it to the back of the painting frame which should be at least 1.5cm deep so that the drawing does not touch the silk that is stretched and pinned to the front of the frame.
Leave the drawing attached to the frame throughout the painting process. You should be able to see the working drawing through the silk without difficulty, if you cannot a light box can be used to help you make out the design.
The design could be traced onto the silk with a soft pencil or an auto fade pen. However, pencil marks will be difficult to remove when the painting is finished and lines drawn with an auto fade pen will disappear when the silk is wetted.
To make an accurate copy when tracing gutta lines onto the silk always work directly above the drawing.
Choosing Colours
You can choose a range of colours to use for each design or follow the example shown. Bear in mind that within an area the light colours must be painted before the dark colours and that layering transparent silk paints will have the same effect as mixing them. So the rules of colour mixing apply when over-painting transparent colours. Reds and yellows will produce oranges, yellows and blues will produce greens, and blues and reds will produce violets.
Experiment when mixing colours in your palette. By varying the amount of each colour used in the mixture you will create even more exciting hues. When mixing a darker colour for shading and shadows try adding the complimentary colour rather than using black.
It is sometimes helpful to establish the full tonal range for a small area of the painting before moving on to paint other areas. Don’t be afraid to use dark shades against the light tints of the colours you choose. This contrast gives form to objects and helps create the illusion of perspective.
Testing Colours
Test the colours you mix on a piece of cartridge paper or watercolour paper. The paper absorbs silk paint at about the same rate as silk. The dried colour you see on the paper is the colour you will see when the silk painting is finished. Iron-fixed silk paints do not change in hue or intensity as they dry, or when they are fixed.
When mixing colours in a palette, count the number of drops of each colour of silk paint. Use a pipette to dispense the water and note the amount you use. Paint a sample of the colour on a piece of paper. Make a written note of the number of drops of each colour and the amount of water used so that you can easily reproduce the exact colour if you run out during the course of painting.
Applying Gutta Lines
Never fill a plastic bottle more than a quarter full with clear water-soluble gutta. This will give you more control and help you to draw even lines without blobs. Always tap the upturned bottle before use to remove air bubbles and test the flow of gutta from the nib on a piece of paper.
When drawing a complex series of gutta lines, draw and dry a few at a time especially if they meet or cross each other. Dry each set of lines with a hairdryer as soon as they are drawn. A nib usually produces rounded points. A cocktail stick can be used to draw out wet gutta into sharper points.
When painting try not to wet the dried gutta lines because the water-soluble gutta will dissolve and wet paint will seep through the gaps.
Removing Unwanted Gutta Lines
Unwanted gutta lines can be removed if necessary by repeatedly wetting the gutta and dabbing it off the wet silk with a paper tissue. Take care not to rub the silk because you may also remove partially fixed paint. Finally dry the silk with a hairdryer and continue with the painting process.
Painting Wet into Damp
The technique entails painting wet into damp which for many silk painters means getting used to wetting the silk before painting. The silk should be damp so mop up excess water with a paper tissue.
This method is crucial when painting and blending areas of the silk where no gutta lines have been applied to restrict the flow of silk paint.
Wetting the silk allows the artist to control the paint’s movement. If paint is applied while the silk is dry the artist has little control of the flow and the result is unwanted blotches and tidemarks.
When you paint onto damp silk, dampen a much larger area of silk than the area to be painted. As the paint spreads, the damp silk will soften its outline. However, if the paint reaches the edge of the dampened area, a hard outline will form.
Using Gutta Lines
Once you have established a gutta line use it to resist the next colours and shading in that part of the painting. To shade up against a gutta line, dampen a large area of silk around the line and paint a narrow stripe adjacent to it. Starting from the unpainted area, push the paint towards the gutta line using a brush loaded with clean water.
The water will blend and soften the outer edge of the painted area and create a crisp edge next to the gutta line. Do not use too much water on your brush. Dry the silk quickly to capture the subtle gradation of colour.
Only paint or shade to one side of a gutta line unless you want to make a feature of that line.
Correcting Mistakes
If you accidentally cross a gutta line with paint or paint seeps through a break in the line try to remove some of the paint with a wet cotton bud. It will be impossible to remove all the paint. The best action in cases like this is to contain the “accident” and make it look like part of the design. Outline the “accident” area with gutta and paint shading within the line. Add similar gutta lines and shading in other appropriate areas. One shaded area may look like a mistake but three shaded areas will look like an intentional part of the design.
Using a Hairdryer
When using a hairdryer to dry wet paint do not stop until all the silk is completely dry or you will create unwanted tidemarks. The heat from the hairdryer will fix iron-fixed silk paints.
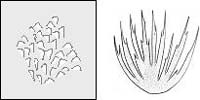
Using Stencils and Templates
By using a simple stencil or template you can easily create shaped paint marks on the silk.
The first example is the stencil for the petal markings on the "Rhododendron" design and the second example
is the template for the "Tulip" design.
Cut the stencil or template from a thin sheet of acetate; lay it on the wet painted silk and dry the silk quickly without wafting the hairdryer.
Full details of the use of stencils with silk paints can be found in my ebook "Decorative Effects using Silk Paints".
Painting Mottled Effects
To create a light mottled effect paint the chosen area wet into damp with random brush strokes leaving some areas unpainted. Before drying the silk with a hairdryer dab the painted and unpainted areas with a brush loaded with clean water.
To create a multi-coloured mottled effect paint randomly with several coloured paints and let them mix and blend before drying the silk.
To create a dark mottled effect pre-paint the area with a background colour. Dampen the painted silk and using a dark colour paint the area wet into damp with random brush strokes leaving some areas unpainted. Before drying the silk with a hairdryer dab the painted and unpainted areas with a brush loaded with clean water.
Painting Backgrounds
To obtain an even coat when painting large areas like backgrounds dampen the whole of the area to be painted. Start to paint at a restricted part of the area and paint as far as the next narrowing. Let the paint blend into the unpainted section and then dry the silk with a hairdryer.
Re-dampen the whole area both painted and unpainted. Continue to paint where you left off. Dilute and blend the paint where it overlaps the previously painted section. Continue in this way until the whole area is painted. If you want to darken the painted area give it another coat of paint repeating the process.
Fixing Silk Paints
Even though silk paints are fixed by the continual use of a hairdryer when using the “hidden” gutta technique, it is best to be safe and follow the manufacturer’s instructions to fix the paints once the silk painting is completed. This usually involves ironing the reverse of your silk painting with an iron set on its silk setting for two to three minutes. The heat and weight of the iron bonds the paint to the silk. Some manufacturers recommend leaving the silk painting for 24 hours to allow the paint to “cure” before washing out the water-soluble gutta.
Removing Water-soluble Gutta
Water-soluble clear gutta is removed from a silk painting by washing it in lukewarm water. Specks of dried silk paint that have been accidentally painted over the clear gutta will float to the surface of the water. Try not to get these on the silk. Rinse it in cold water to remove them and any scum formed by the dissolved gutta.
Conclusion
To explain in detail every step involved in creating each silk painting would not be practical. There are notes with each design but the best way to grasp a new concept is to put it into practice. So don’t worry if you make mistakes. Work out why things went wrong and learn from the experience. And finally;
PLEASE DON’T FORGET TO WET THE SILK!